Month: February 2023

How to use URLSCAN part4

This is the part 4 and the last of (How to use URLSCAN part3 – osintafrica)

  • SEARCH

URLSCAN can help to perform different types of searches to find more information about an indicator such as IP address, domain, file, hash, ASN number and others.

Click on the “Search” button.

It is very important to first read the documentation. Click on the “Help” button to read about how to perform different searches.

Let’s give some examples of queries that we can perform in the Search menu.

  • Search for domain

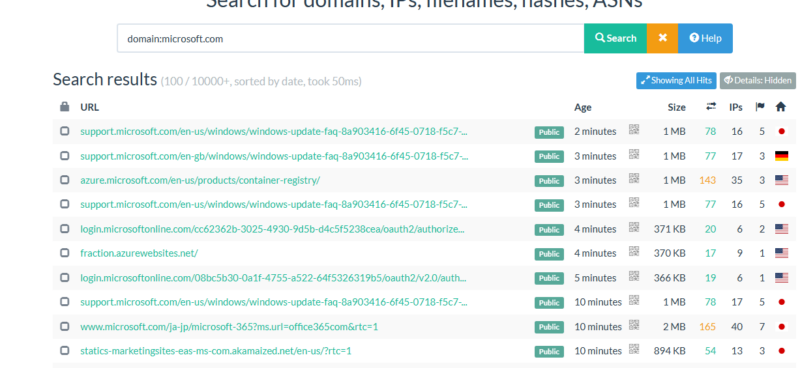
If you want to find more information about a specific domain such as how the domain looked before and the connection between the domain with others domains or website, you can use the “domain:” query. We will give an example using microsoft.com.
Search - urlscan.io


In the image above, we can see the search result showing the domain Microsoft.com with different subdomains related to Microsoft.com and others domains or website where Microsoft.com was mentioned following with the time and the location it was scanned.

Click on each link where Microsoft.com is mentioned to see how the domain was at the time it was scanned; this technic can also help you as analyst to find out how the domain looked in the past. Many phishing websites changed the website interface after abusing many people over the internet so this technic can reveal such activity.

As you see, they are some domains or subdomains where Microsoft.com is not mentioned, we need to find out the relation between Microsoft.com and the domain.

Click on fraction.azurewebsites.net, go to HTTP transaction, search for Microsoft.com
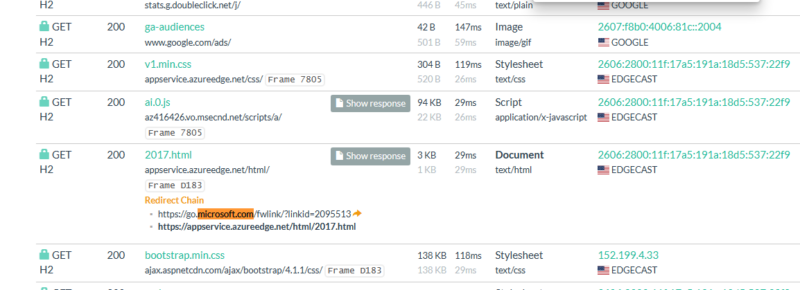
AS you can see, Microsoft.com is used as redirect chain. This technic is often used by the threat actor to hide their activities and it can be also used to find the correlation between the domains.


  • Search for IPs

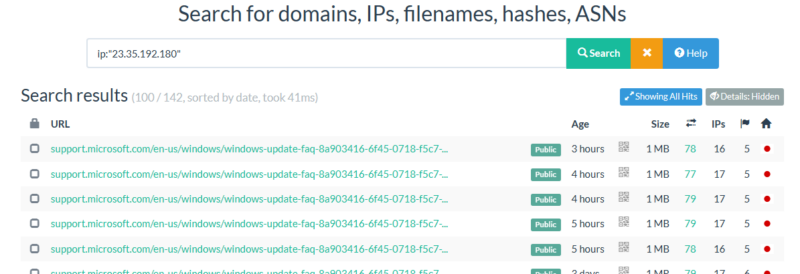
Search - urlscan.io

As you see in the image above, we entered the IP address 23.35.192.180 and we got the domains and subdomains behind the IP address. This technic can be used to find phishing related domain behind an IP address.

  • Search for Hashes

The hash can help you to make a correlation between the domains. Usually, the threats actor can use the same file but changed the domain, so this technic is good one to find such activity.

Example:

Click Microsoft.com, go to HTTP transaction, expand one http transaction request where the hash is available.
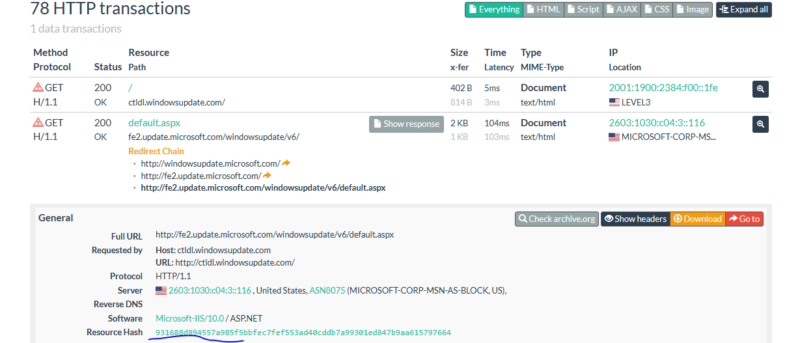
Hover the mouse on the hash and copy the hash, click on the Search menu and enter the query like you see in the picture below.
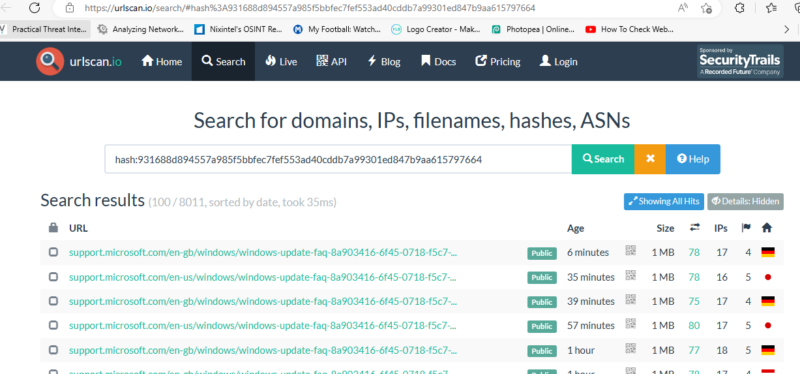
Now, we can see others websites that’s used the same hash.

  • Search for Filenames

The same thing as we described in the previous section, the same filename can be used by the threat actor but with different domains name, we can use the same technic like we did to find the domain or website that used the filename. Be aware that the same file name does not mean that the file if the same, you need to compare the hash and also the file content to ensure that the files are the same.

Example:

From HTTP transaction, copy the file you wish to check

Go to search, enter the query like you see in the picture below, all the result from the search will appear.
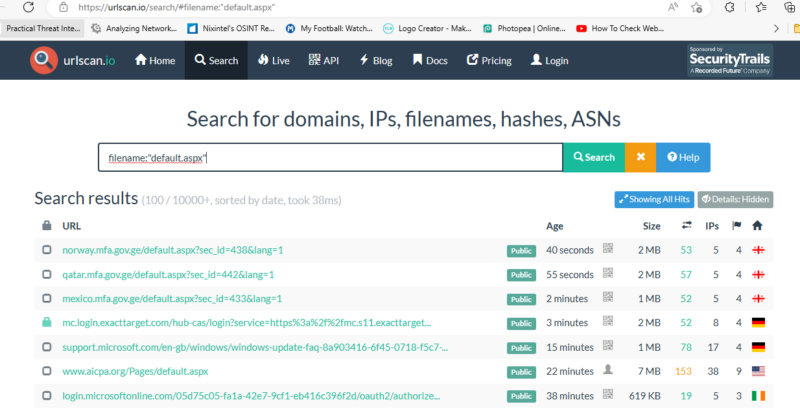
In order to verify if the file is unique, click on the URL, go to HTTP transaction compare the hash and the file content.

Like I said before, you can perform many types of searches using the search field. As a security guy you should know what you are looking for before making the search. The best way to learn is by practicing on the daily basis.

To conclude what we have explained, URLSCAN is very amazing tool that all security guys should use to make easier their job while analyzing different information like we showed in our examples.

The tool can help you save many times as it contains many types of queries that will help you to find more information during your analysis.

If you never used it, it is the time for you to start using and if you did not know the features we explained, then we suppose that you already know so enjoy.

How to use URLSCAN part3

This is the part 3 of (How to use URLSCAN part2 – osintafrica)

Now, lets go to the “HTTP” menu

  1. HTTP

In this menu, we can see all the HTTP transactions after the URL has been submitted.

The HTTP transactions consist of all the resources (HTLM, Script, AJAX, Images …) used by the website.


This section is very useful for the analyst.

Click on one of the options available

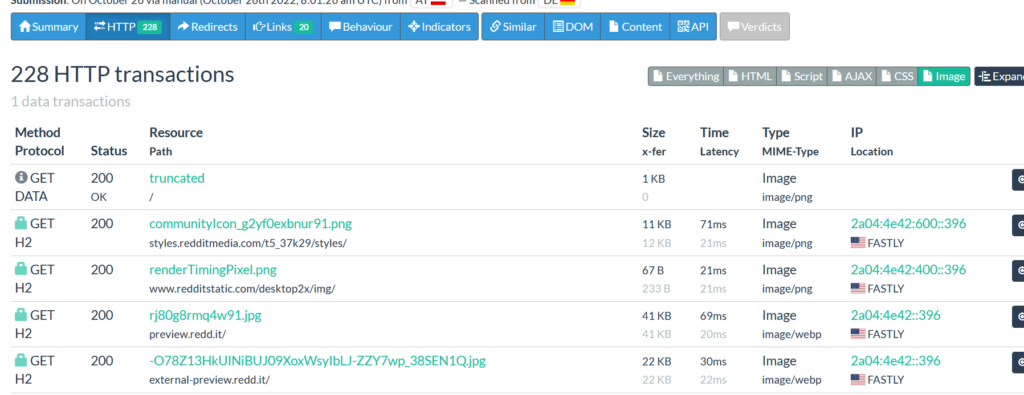
  • In our case, we click on the button “Image” to find the image described in the section Image and all the files used by the image.

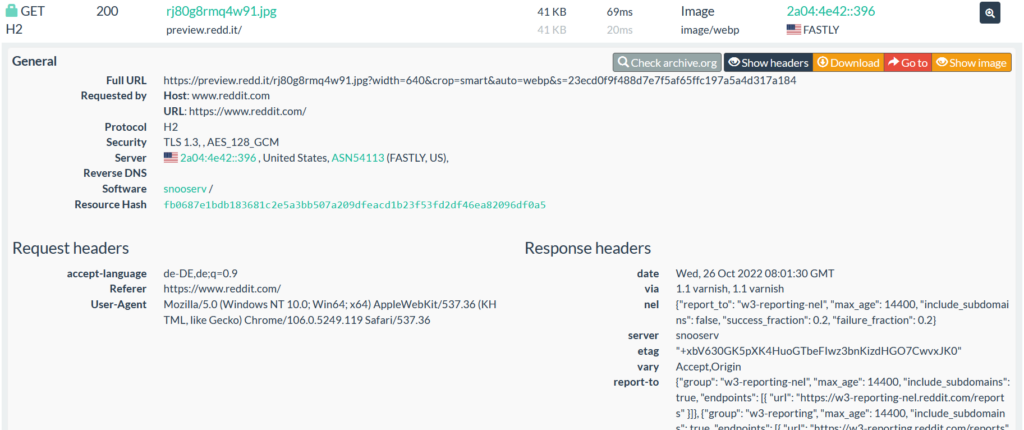
Click on the “expand” sign to see more details about each file.

We can observe the following details:

Full URL shows the requested image from Host: www.reddit.com.

We can find others information such as the server’s name used, TLS protocol version used, the Hash of the image used, the software used and others …

Click on the Show headers to find the details about the request headers and the response headers from the server side.

Click on Check archive.org that will lead you the website https://web.archive.org (You can Google search to find more information about it)

Click on each option (HTLM, Script, AJAX, Images) available to learn more about.

2. Redirect

Here, you will find all the redirect links on the website.

3. Links

The page contains all the links available on the website.

You can click on each of them or scan each of them to more details about.

4. Behaviour

The menu contains the information about the Security Headers, the Cookies, the JavaScript global variables used

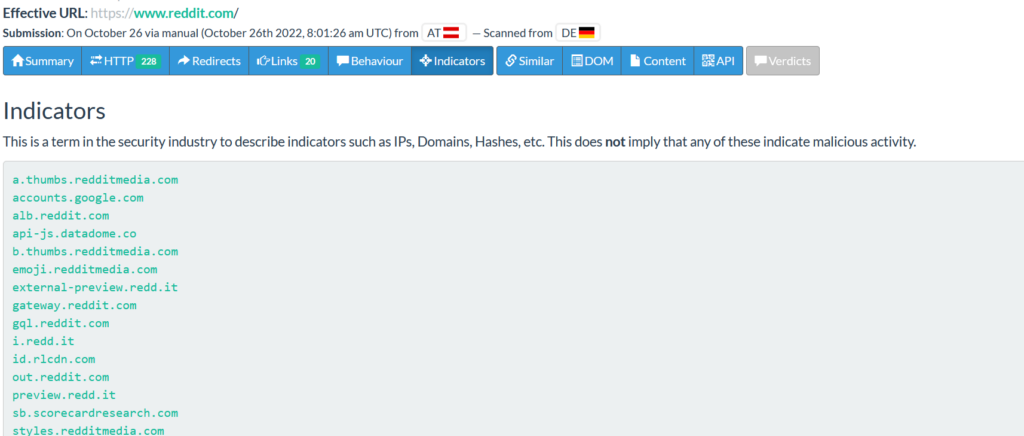
5. Indicators

This menu contains all the domains, IP addresses, hashes used by the websites.

6. Similar

You will find some information about the URLS, ASN numbers, IP address, domains scanned on the website.

7. DOM

This menu is very useful as it has the whole map of the website such as the scripts used by the website, the HTML code used by the website and others …

8. Content

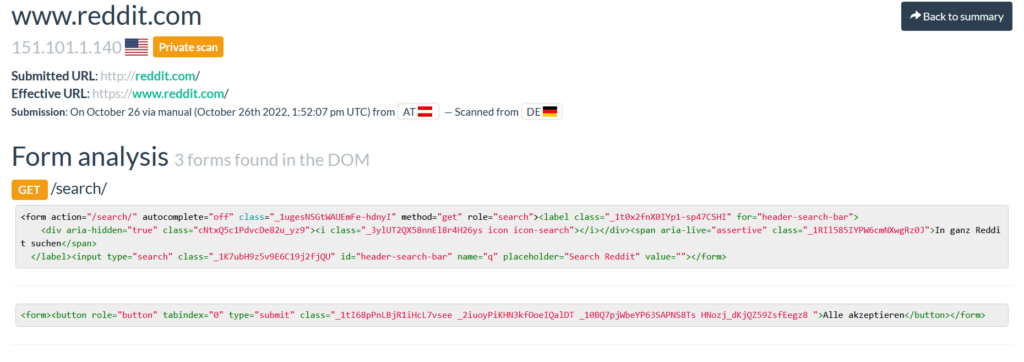
the Form (Google search for Form object DOM) used in DOM is available.

9. API

The API used by URLSCAN to get the information from the servers

Part4 (How to use URLSCAN part4 – osintafrica)


How to use URLSCAN part2

This is the part 2 of How to use URLSCAN part1 – osintafrica

Now, let’s move further, we can see in blue color, 11 menus available.

Now we will describe the utility of each menu

  1. Summary

Click on the “Summary button” to find more details about the menu.

The menu contains all details about the submitted domain.

When you look at the image above, the following details are visible:

The number of domains and IPs that were contacted by the submitted domain.

The main IP address with location and the domain hosting provider are also available.

The certificate detail used by the website with his validity period.

The website was scanned 3 times

  • Show scan

This submenu will show you the number of times the domain has been already scanned. You can click on each scan to have more details such as how the domain looks at the time it was scanned, the IP address, ASN behind the domain at the time it was scanned.

  • Domain classification

The second part of the Summary menu is the classification of the domain provided by Google Safe Browsing.

The image above shows that Google Safe Browsing classified the domain as “No classification” which means that the domain is cleaned following the rating score available on Google Safe Browsing.

  • Domain and IP information

7 submenus are available at the section.

The menu IP/ASNs contains the information about all the IPs addresses contacted by the domain while being submitted with their ASN (Autonomous System Number).

You can click on each IP address and ASN to find more information.

The submenus “IP Detail” and “Domains” and “Domain Tree” contain some information about the IPs and the domains contacted by the submitted domain. You can click on each section to see the information available.


The submenu “LINK” contains all the link redirecting to others domains or URLS.

You can click on each link to get more details about.

The submenu “Certs” contains the list of all certificates used by the submitted domain with the validity period.

You can click on the crt.sh on the right side to get more details about the certificate


The submenu “Frames” will show you if the website is using any URL Frames.

  • Image

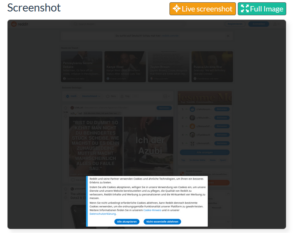
After describing different submenus from the Summary, from the right side, once the domain has been submitted, the main image from the website will appear in real time.  

We can see how the website behind the domain submitted looks like. This is very important during an investigation, for example when you are analysing a phishing issue, it is necessary to view the website without connecting directly to it.

You can click on “Live screenshots” and “Full Image” to have better visibility of the image.

  • Detected technologies

Here, we can find some technologies used by the domain. Notice that this is very important for you as analyzer. For example, When the website is compromised, the threat actor might embed a malicious code into the website, by checking this, you might find out the malicious code embedded within your website, checking this, can also help you to find some technologies that need to be updated or are not in used anymore.

  • Page Statistics

This section shows you the whole details about the submitted URL such as HTTP request, domains, subdomains, cookies, IP etc …

Part 3 (How to use URLSCAN part3 – osintafrica)

How to use URLSCAN

URLSCAN is used to perform different types of web scan and also to analyze different IOCs such as IP address, domains, Hashes, filenames and others.

URLSCAN is a tool used by different security teams such as Security Analyst, Cyber Threat Intelligence, Threat Hunting, Incident response team and others.

The tool is divided in 2 versions (community version and paid version).

We will talk about the community version that is available for free.

In order to connect to the Web application, you need to type the domain (urlscan.io), once you connect to the domain, you will get to the following screen.  

In our case, we need two menus (Home and Search)

  • HOME

Once we click on this menu, we can see the scanned queried by the users from different locations.

By default, the tool is showing the public scan mode, if you want to leave the default mode and scan anything, the scan will be visible by everyone.

So, we advise you to click on option and used the private mode if you do not want other people to see the query you entered, this option can also help to avoid alerting the threat actor about your findings.

URLSCAN can anonymize your identity.

Examples:

  • If you want to hide your location, you can click on “country selection” or auto (be aware that the Country selection for the private mode works only on the Commercial plans.)
  • You can change the “User Agent”. For example, if the website you want to scan is for the mobile phone – you can choose one of the Android User Agent.

You can also customize your own User Agent.

  • The “HTTP referer” can be used to custom the HTTP header before scanning.


Now, lets scan in a private mode a URL in hazard and analyze its behavior.

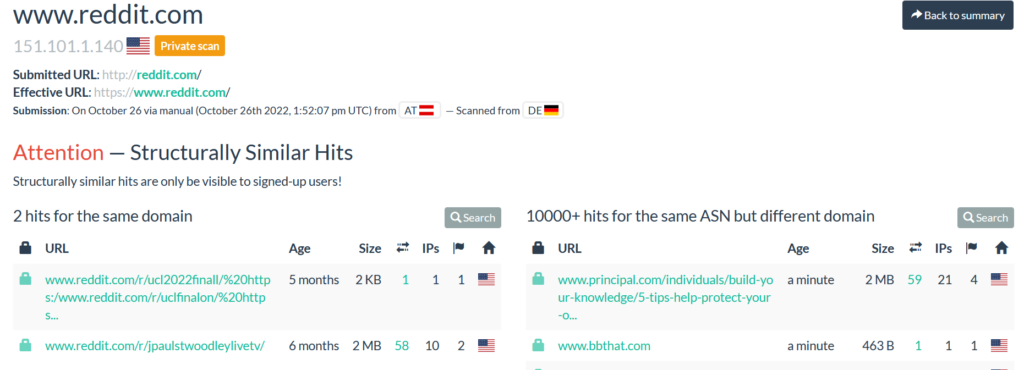
After submitting the URL, we can see the IP address 151.101.129.140 from the submitted URL following the submitted URL and the effective information.

From the right side, we can see 5 menus.

The menu “Lookup” will direct you to find different tools such as (Virus Total, crt.sh, Riskiq …). The tools can help you find more details about the submitted domain (click on each of them to learn more about). 

The option “Go To” will bring you to the domain submitted webpage (be careful before you click on it in case it is a malicious domain, you might be compromised).

The option “Rescan” is used to rescan the submitted URL.

The option “Add Verdict” and “Report” are used to add some comments about the submitted domain and contains some details about the scan report. 

The next part is described in the part 2 (How to use URLSCAN part2 – osintafrica)

L’importance de SDLC dans le développement d’une application

Savoir coder est diffèrent de savoir protéger un code. Les failles au niveau des applications de nous jours sont l’un des problèmes majeurs que les experts de la cyber sécurité font face, cela est dû au manque d’intégration de la sécurité dès le début du codage. La plupart des développeurs ne tiennent pas compte de la sécurité par manque de connaissance et de suivi. Pour remédier à cela, il faudra suivre des bonnes pratiques telles que : manque d’intégration de la sécurité au moment de la conception jusqu’ au niveau du développement, de la maintenance et la disposition d’une application, manque de certification et accréditation pour valider l’application, manque d’évaluation périodique, manque de protection du code source de l’application et d’autres.

Il faudra aussi savoir qu’il y aura toujours des failles au niveau d’une application quelles que soit les précautions prises. C’est pourquoi l’intégration de la sécurité est très primordiale.

Les failles sont recherchées et exploitées par les hackers pour avoir accès a l’application pour des raisons telles que : Voler des informations confidentielles, demander une rançon ou bien faire cracher l’application. 

Pour mieux vous informer sur les attaques perpétrées par les hackers, vous pouvez consulter le site web : OWASP Top 10:2021.

En effet, il y a des guides ou des bonnes pratiques et des méthodes que nous pouvons suivre pour rendre notre application plus sécurisée.

Guides ou bonnes pratiques :

Chaque logiciel développé doit avoir un minimum d’exigence pris en compte. Il faudra toujours suivre des guides ou bonnes pratiques pour se rassurer que le logiciel développé a respecté certains critères au moment du développement.

Exemples :

  • Validation des entrées
  • Mettre en place et moyen (Identification, Authentification, Comptabilité, Audit)
  • Gestion des erreurs
  • Revoir le code pour découvrir des failles
  • Validation et vérification de code

Software développement life cycle :

SDLC (Software development life cycle) est la méthodologie utilisée pour concevoir, développer, sécuriser, implémenter, tester, et maintenir une application.  

SDLC est primordial dans le développement d’une application. Il permet de suivre et d’ordonner le développement d’une application et d’intégrer la sécurité dans chaque phase.

Le SDLC permet aux équipes telles que : les programmeurs, les gestionnaires de projets, Analystes, et d’autres dans le développement de l’application) de mieux collaborer de la phase d’initiation a la disposition de l’application. Le SDLC est compose de différentes phases qui sont :

Phases de SDLC 

  • Initiation et planification
  • Définition des exigences fonctionnelles
  • Design
  • Développement
  • Implémentation
  • Certification et accréditation
  • Opération et maintenance
  • Disposition

Model de SDLC :

Comme déjà dit dans nos textes, SDLC est une méthodologie utilisée pour mieux concevoir une application. A ce fait SDLC est base sur des modèles, l’utilisation des d’un modèle est très important dans le développement d’un logiciel car cela nous permet de s’adapter aux exigences du client.

Dans le développement d’un logiciel chaque projet est spécifique il faudra se referrer ou se baser surr un model plus approprier pour atteindre l’objectif.

Exemple de SDLC modèles tels que :

  • Waterfall
  • Spiral
  • Rapide application développement
  • Cleanroom
  • Prototype
  • Agile

Importances de SDLC

  • Planifier et gérer une application
  • Mieux sécuriser une application
  • Tester et évaluer une application
  • Réduire les risques et vulnérabilités sur un logiciel

SSDF (Secure Software Development Framework)

Malheureusement la sécurité n’est pas adressée dans certains modèles de SDLC. A ce fait, SSDF doit être ajoute et intégrées à chaque implémentation SDLC.

SSDF est compose de pratiques de développement de logiciels pour mieux sécuriser une application. Il a été établi par les organisations telles que BSA, OWASP et SAFECode  Secure Software Development Framework | CSRC (nist.gov).

SSDF va permettre de réduire le nombre de vulnérabilités, l’impact d’exploitation et autres.

En conclusion, le SDLC est essentiel dans le développement d’un logiciel. Une application ou un logiciel développe sans suivre le SDLC est comme construire une maison sans plan. Faire une bonne conception, bien développer et intégrer la sécurité est primordial pour n’importe quel logiciel.